mercredi 30 novembre 2011

Noir et blanc

Hexacorallia in black and white

Un collier terminé in extremis pour le challenge noir et blanc sur Parole de Pate. Kato polyclay en blanc et noir gravée d'après des transferts de dessins anciens adaptés, trouvés sur le site de l'Educational Technology Clearinghouse de Floride, peinture acrylique noire. Je ferais un bref tuto quand j'aurais le temps (pas tout de suite, donc).

A necklace I finished minutes ago for the black and white challenge on Parole de Pate.
Kato polyclay in black and white, engravings using old drawings adapted from those found on the Florida's Technological Clearinghouse website, black paint. I will explain how I did it when I have time.

Il y eut pas mal de casse dans l'opération, et partie d'assez de lentilles pour faire plusieurs colliers, il n'en resta qu'un d'arrivé à bon port.
Un s'est perdu au dernier moment : les lentilles noires et blanches qui devaient être assemblées ne vont manifestement pas (ou plutôt plus) ensemble.

Lots of disks got lost in the process, the ones just above at the very last minute: antiquing transformed them just enough that they would not look good together.


Il reste beaucoup de lentilles, mais le problème est visible sur la photo: elles ont changé de couleur à la cuisson, aussi bien les noires (et translucide) que les blanches, et il n'y a plus de quoi assembler des colliers entiers et assortis. C'est la première fois que cela m'arrive avec la Kato, mais j'ai eu trois couleurs légèrement différentes en trois cuissons, en partant des mêmes paquets...

There are lots of engraved disks remaining, but not all can be used as the baking process (which I performed in several distinct occasions, a mistake obviously) changed the colors, both dark and light. This is the first time this happens to me with Kato polyclay, but this time it gave me three different colors for each shade from the same pack and even conditioning... A few might still be salvagable for Christmas presents.

jeudi 15 septembre 2011

Elder sign experiments

I like jewellery made of beads that look like stones or branches. I have started experimenting to build a bracelet or a necklace with polymer "wood" or "coral", and stone-lookalikes. Now I am somewhat satisfied with my quartz mix (although this last iteration is a bit too pink for my taste), I made some stones beads.
I did not like their shape too much (and they had an already baked core from sculpey light: no way to alter that), so I wanted to somehow add interest. I went for the classics, with the two Elder Sign versions and the yellow sign, Propnomicon version (I known, it is upside down on the picture). I must admit I like the two branching patterns best. The others need some ameliorations, so I set to make more.

The next generation of stones, unbaked, and one of the rough sculpey light cores. The shapes already look more interesting. These all have two parallel channels for thread, and are much flater than the previous ones.
I then added the lines and baked.

To go with these, I have started working on twigs with Randee M. Ketzel's great tutorial. The color of the stones is still off, but I will do better next time...

lundi 5 septembre 2011

Plus de cailloux...

Still in the silicon molds, and antiqued with black acrylic paint: Premo frost, ochre oil paint, metal fillings, and mica substrate from one of those canned plants. The canned plant did not grow, but the mica flakes substrate has found a new use. Lower picture : liquid Fimo, metal fillings and mica. I should not have left it alone before putting it in the oven, all the flakes and fillings fell to the bottom, but the liquid fimo is remarquably clear.

Toujours dans les moules à chocolats. Cette fois, Premo Frost, peinture à l'huile ocre, paillettes métal et surtout paillettes de substrat mica provenant d'une de ces canettes à plantes (la plante n'a pas poussé, mais le substrat est en cours de recyclage...). La photo du bas : Fimo liquide, paillettes métal, et mica. Note pour plus tard : ne pas laisser reposer, tous les morceaux tombent au fond...

Next time, as a treat, better pictures thanks to this high tech setting (for which I need to thank Jen at Epbot):

vendredi 2 septembre 2011

Faux et usage de moules (VF abrégée à la fin...)

I had wanted to try faux stones from polymer clay for a while. I made a few tests two weeks ago, but they did not turn out quite as expected (mainly my fault, really), and were simple beads anyway, nothing very interesting. Last week, I tried again, this time with more attention to the details. I used three colors, a Fimo turquoise straight out of the pack, a turquoise-ish, greenish mix, and a red-orange mix that was first destined to become coral, but got structurally weak because I mixed too many things in the clay.

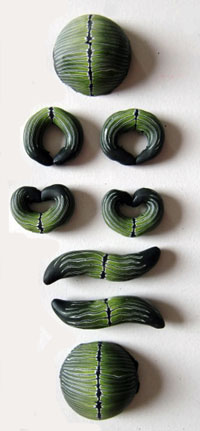
I made a rather simple mix using black acrylic paint, and rough clay pieces made with a grater, the standard « turquoise »mix found in almost all websites (see GlassAttic and the Polymer Clayspot for instance) and in books (Carol Blackburn's Making Polymer Clay Beads). The more interesting part (for me, and hopefully for you too as I have not seen it yet described elsewhere), is what I got using cheap silicon chocolate molds (1.99 euros) to make cabochons. The molds come in a variety of shapes on the same plate (see picture), and of course are oven-safe. I aggregated the clay and paint in the mold to make a relatively fine layer (0.3 to 0.5cm) without working it too much, and baked. In parallel, I baked fine (0.15cm) slices from canes inspired by the Donna Kato squiggly beads (from her Millefiori Techniques book) and Melanie West's striped canes in the same molds (last picture below).

The resulting cabochons are quite nice and get the turquoise effect accross as I wanted, but this is actually a less than optimal use of the molds, because the look necessitates sanding the paint off the surface. The molds are so smooth inside, that they result in the same shiny and smooth surface as clay in contact with glass or tiles during the baking. The acrylic paint is fused to the surface and both form a beautiful shiny surface (see close-up). Of course, this works only if the clay was pushed well into the mold : see the difference between the red and the green stones... The cane slices gave a less shiny, but still very satisfactory result, although I had to sand one because of black clay pieces that got stuck between the clay and the mold.

This could be used to make all shapes and sizes of cabochons, as the base can be cut or sanded away to make a smaller or a flater piece, or the mold not filled to the brim. Assembling two half spheres would also yield nice hollow beads, I have to try that.

Version française abrégée :

Les moules en silicone pour chocolat offrent de très bonnes possibilités pour réaliser des cabochons creux (ou pleins, si le coeur vous en dit). Jusque là, rien de bien révolutionnaire, mais j'aime bien redécouvrir l'eau chaude. Etant donné que les moules sont très lisses, les surfaces résultantes peuvent être comparables aux surfaces brillantes obtenues en contact avec du verre ou de la porcelaine, mais avec une grande variété de formes (et un démoulage très simplifié) : c'est utilisé par beaucoup de monde pour fabriquer des cabochons de résine, voire en fimo liquide. Mais les mélanges peinture acrylique/morceaux de polymère tels ceux employés pour les techniques de fausses pierres (turquoise, etc), donnent de très beaux résultats, extrêmement lisses et brillants (cf photos) si on a bien mis en contact le mélange et le moule (pas comme dans le cas des pierres rouges...) et qu'on fait cuire dans celui ci. La taille des cabochons peut être réduite après cuisson en découpant l'arrière et/ou en le ponçant jusqu'à arriver à la hauteur désirée, et en ne remplissant pas les moules jusqu'à ras-bord...

jeudi 4 août 2011

The alchemist's bottle cabinet

Etagère en carton et papier mâché peinte. Détails moulés en pâte de papier, dorés au doigt à la cire. Mortiers et pilons en porcelaine trouvés à un vide-grenier.
Shelves out of cardboard covered with papier mâché and paint. Details molded out of paper paste and accented with brass wax gilt. Old lab mortars and pestles from a garage sale.
Illustrations on the bottles: ancient medical illustrations (courtesy of the National Library of Medecine, www.nlm.nih.gov/exhibition/historicalanatomies/home.html), watch face and animal engravings courtesy of Cathe Holden (http://justsomethingimade.com/)The complete lab, iteration 1/Le laboratoire complet, première version

lundi 1 août 2011

The return of the bottles (version abrégée en francais à la fin)

The bottles were finished a quite long time ago, but as usual, I am late with the posting.
These are just a small sample, and I will post a picture of the whole "alchemist's lab"(or at least, of how far it is currently, because I sense it is still going to be ameliorated a lot).
The labels once done, the bottles still looked way too modern. The thread at the neck, bottle-specific designs, and the caps all posed problems.
I replaced the plastic caps of the narrow opening bottles by cork tops, aged using acrylic paint.
The larger caps, with a metal core, were covered with polymer clay. Each top is slightly different from the others, and it was a great way of experimenting with different techniques and the stamps I had at hand. They were given depth after baking using oil paint or acrylic paint (or both, for some), until I was satisfied with the effect.

I covered the visible part of the threads using fine bands of polymer clay (chocolate Fimo classic, finest setting of the pasta machine, and 0.5-0.7cm wide) wrapped around. For the bottles with the cork tops, I competely covered the threads, as they were not going to be of use anyway (left bottle on the picture). For the jars with their original tops, I only went as high as not to disturb the use of the top (middle and right jars). All were given depth after baking using darker acrylic paint.
For larger areas to cover, like the jar in the middle, I used linen cord. I stabilized it after wrapping using white glue, and antiqued it using diluted acrylic paint. I also used white glue, finger painted on the pottles, to take away part of the shine of the glass (not visible on the pictures, as it was performed afterwards). It would probably be better to use some varnish, but I had little time and many kinds react badly with polymer clay.
Each jar looks cool in itself, but they look even better together :


Pour améliorer l'effet visuel des étiquettes, il fallait camoufler le pas de vis, les bouchons, et certains détails des bouteilles.
Pour les bouteilles à col étroit, le plus simple est de remplacer le bouchon à vis en plastique par un bouchon en liège retaillé et assombri à la peinture acrylique. Pour les autres, j'ai recouvert le couvercle d'une couche de Fimo. C'est une bonne occasion pour tester toutes sortes de décos. Après cuisson, il est possible d'ajouter du relief avec de la peinture acrylique ou à l'huile, voire les deux (juste pas en même temps).

La partie visible des pas de vis a été recouverte de bandes fines de Fimo enroulées tout autour (sur tout le pas de vis pour les bouteilles à bouchon en liège, sur la partie visible en faisant bien attention à ne pas entraver le mouvement du couvercle pour les autres). De la peinture acrylique plus sombre a ensuite été utilisée (peinte puis essuyée sur les zones en relief avec un sopalin. Pour couvrir des surfaces plus grandes (comme pour les deux bocaux semblables de la photo au dessus), j'ai utilisé de la ficelle de lin enroulée, fixée avec de la colle à bois et noircie avec de la peinture acrylique diluée. De la colle à bois (ou du vernis) peuvent également être utilisés pour enlever l'aspect brillant du verre.

mardi 17 mai 2011

Making of the alchemists's cabinet

The bottles will be placed in a specially made cabinet, for which I chose to use papier maché, as it is light but very sturdy.
I learned a lot from my previous experiment to make a small bookcase from papier maché. I had the idea to reinforce the edge of the shelves with plastic u-shaped edges (from the DIY shop), and it worked great: the cardboard did not move, and the shelf edges remained straight during the whole building process and afterwards. However, I had not equiped the sides of the cardboard box (the vertical edges) in the same way, so when they got wet (a natural part of the process of putting papier maché on something), they got all wavy. This thime, I put plastic edges on every single edge (see picture left), and painted the carboard with acrylic prior to covering with paper strips to limit the water uptake.
The upper picture shows the almost complete cardboard base, with the edge reinforcements (glued with wood glue and masking tape). The only missing part is the top, which is a single flat cardboard piece cut to shape. I filled the corners with paper paste for strength.
The right side picture shows the cabinet covered with paper strips (the Canard Enchainé gives high quality, water resilient strips, as you can see).
I managed to get a satifactory finish for the paint, but it is still rather fragile. I am looking now for something watertight and resilient (and not too expensive) to finish it...

mercredi 16 mars 2011

Anneau-Monde / Ringworld

An almost all image tutorial for the all polymer clay ringworld bracelet I made for the Perles & co contest with the theme "Visions of the future". A megastructure also known as Dyson ring (albeit it can be argued that this does not quite correspond to Freeman Dyson's idea), Coronal (if your source is Karl Schroeder), Orbital (if you are more Iain M. Banks inclined), or Halo megastructure. The technique is scalable (although I wouldn't relish the prospect of making it smaller). There are way more baking and polishing steps than indicated (between each major step, actually).
If you have questions...

Un tutoriel presque tout en images pour le bracelet anneau-monde (ou anneau de Dyson, ou Coronal , Orbital, ou Halo selon la mégastructure que vous préférez) en polymère (Fimo et Kato) que j'ai créé pour le concours "Visions du Futur" du site Perles and co.
Il y a bien plus d'étapes de cuisson et de polissage qu'indiqué (entre chaque étape majeure, en fait). N'hésitez pas si vous avez des questions (mais la réponse ne sera peut être pas immédiate).If you like it, you can help me fund my numerous DIY addictions by voting for it until the 31st of March on the contest website, in the "amateur" category.
Vous pouvez manifester votre (éventuelle) appréciation en votant pour le projet jusqu'au 31 mars sur le site du concours, catégorie amateur.
Cela pourra peut être m'aider à ne pas dépenser tout l'argent du ménage en fournitures...

samedi 5 mars 2011

Polymer clay specimen bottles 1

I have recently started playing again with polymer clay, and while experimenting with transfers, I started wondering what to do with the transfered picture.
My experimenting pictures were a tad gruesome, especially after I became aware of the Images of the History of Medicine and the Historical Anatomies from the National Library of Medicine (hat tip to Neurophilosophy), so placing them on specimen bottles was the logical next step.
The following tutorial does not present much really new, and I will quote the relevant sources but on the off chance it can be of use to someone, here it is.
I used baking parchment paper/laser printer for the transfer (V. Aharoni, via Glass Attic). I had singled out this method because I did not want to get frustrated with failed transfer, and I wanted to be able to get good transfers from very finely detailed pictures like the old anatomical drawings. It turned out to be a good choice. The printing step is actually the sensitive one, but the transfer itself only failed once (and I had it coming, the way I treated it).
Here is a tutorial/description of the transfer steps with a few tips, using a mix of white/champagne Fimo classic.
I made an antiquing trial using acrylic paint, but the result was disappointing, probably because the surface is flat and does not catch paint much. Oil paint antiquing, on the other hand, gives a great finish in this case. I didn't try on other brands of clays or with color laserjet prints, but I suppose it would work (see V. Aharoni's tests).
The bottles still need caps and ageing to look good...