 Late for Halloween, but maybe in time for the release of last of The Hobbit movies, here is a tutorial for a 3D dragon manicure. It is a bit time consuming (especially the polish drying times), but is not difficult in itself. Polymer clay does not dry out, so you can just start over if you are unhappy with the result. The technique can easily be adapted for many other subjects. You will need two component silicone to make the final mold.
Polymer clay has long been used to make molds for polymer or other materials, and the possibilities are endless.
Any texture tutorial for polymer clay can be adapted for this (generally by reducing the size). Many tutorials for textures by polymer artists are available, some for sale like these from Helen Breil, and some freely available by Sonya's Polymer creations, Sona Grigoryan, Andrea Machler, Galina Grebennikova, Camille Young, Jill Palumbo, Roberta Warshaw and many others. There is also a lot of inspiration available, for instance by Veronique Hoffmann, Lisa Stevens, Sona Grigoryan...
If you have never worked with polymer clay before, start by reading or watching a primer on the material, and especially the safety instructions.
Any brand of polymer clay can be used here, as the solidity is not crucial.
The Eye
Start by making a small base the size of the nail you want to cover with the eye. Mine is actually a bit too large, so measure your nails beforehand.

Make two bands 1 mm high by 2 mm wide, a bit longer than the eyeball. shape their ends into points, and place them around the eye: these will be the eyelids. With a small tool press the outer edges into the base.
Make a long snake, either by rolling the clay or with an extruder. Cut many small pieces of the same size, roll them into small balls (around 1mm in diameter), and place them around the eyelids. Leave a small space around each ball. Once you have placed some all around, start cutting pieces 3 times longer, to make wider balls. Place them around the small inner ring.
Once you have little balls of clay all around, flatten them by pressing them slightly. Use little pressure at first, and stop when you are happy with the result, and the clay has occupied the space you left between the balls.
The model for the eye is ready to bake.

Same as for the eye, only longer (more surface to cover): make a small sheet of polymer, cover it with gradated size clay balls, and press them softly together.
Depending on your litterary reference, you can leave a small scaleless space or not.
I also made a mouth with teeth, using the same approach. However, the result is not all that satisfactory, and can happily be left out.
Mine is a good 4cm by 6cm, so I can make enough surface for a whole manicure at once.
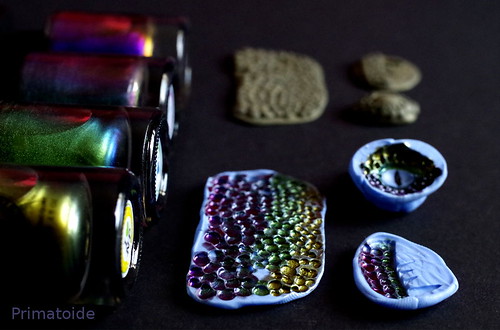
 |
| The molds and the polymer originals |
Bake the polymer clay according to the manufacturers instructions.
You now need to make a silicone mold for the polish from your model. You can find the instructions I detailed for natural textures here.
Make a relatively fine mold (2-3mm), it will be easier to unmold later, but not finer than 1mm in any point or it might tear.
You can see on the right the models and the molds, including a small brain made by coiling polymer snakes in a symetrical way on a small base.
 |
| The first layers of multichrome polish. I used 4 colors. |
Again, the process is the same as for the natural texture decals.
Start with the colors you want on the surface. You can make a color gradient easily by juxtaposing and mixing colors in the recesses of the mold,
It is very easy to control finely the position of the colors using a fine brush for the details (or a toothpick or a dotting tool). I painted the pupil in black, and once it was dry covered it with a star shaped pattern in red, and then in gold. Glitter also looks great for the iris.
 |
| The mold, the decal, and the polymer clay model for a glow in the dark, 3D brain decal. |
Leave to dry overnight.
Once the decal is correctly dry, you can carefully remove it from the mold. Pull the edges of the mold down, and once you can grab the decal lift it out.
 |
| Cutting the polish decals to size |
Trim the eye to the size of your nail using fine scissors, and cut out pieces of the right size for each nail out of the larger decal.
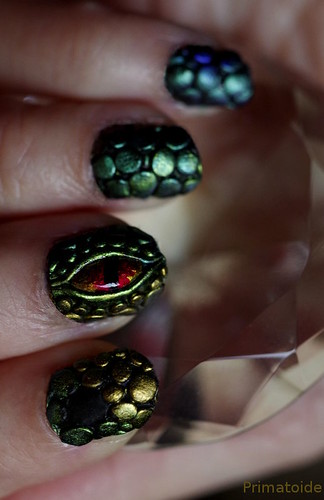
Work nail by nail. It is best to prepare the nail with a layer of the color of the decal (and base coat, top coat...).
 |
| Yeah, that one was way too much. I repaced it by a simple scale pattern. |
Leave to dry, trim to size and clean up.
While the whole process takes a while (and must be planned in advance), the decals are fast to put in place, and can be prepared beforehand.
Once the molds are ready, making another set is rather fast. With different colors, an abstract pattern can look completely different from one use to the other.
3 commentaires:
that's amazing!
Thank you very much, Sabbatha !
It is easy too, and I would love to see what others do with this...
Thank you for providing me a informative blog. I enjoyed it thoroughly, it helped me a lot for what i was searching for. Keep it up. For more details about Mold 4cm Visit: Mold 4cm
Enregistrer un commentaire